
This assumes familiarity with SQL Server Management Studio (SSMS), and the proper permissions to make these changes.
- Enable Mixed Mode Authentication
- Create an SQL User
- Create a "UDL" file on the Client machine
- Make changes to the ini file
Ensure that Mixed Mode authentication is enabled using SQL Server Management Studio
- In SSMS Object Explorer, right-click the server, and then click Properties.
- On the Security page, under Server authentication, select the new server authentication mode, and then click OK.
- In the SQL Server Management Studio dialog box, click OK to acknowledge the requirement to restart SQL Server.
- In Object Explorer, right-click your server, and then click Restart. Note: this will disrupt any users currently connected to this database.
Create an SQL User
- Launch the Database Utility Program (located on the database server). For older versions of Windows, right-click the shortcut and choose Run As Administrator.
- Connect to the proper SQL Server hosting your ESHA Database.
- From the drop-down on the toolbar, verify the correct database is selected (typically 'eshadata' for Food Processor).
- Click on Users > Manage.
- Click the New button.
- For Authentication, select SQL Authentication
- Type in a User Name and Password (repeated for verification).
- Click "Create"
NOTE: If using SQL Server Management Studio to create the SQL user, it is recommended to deselect 'User must change password at next login'. Also, this Login must be made a member of the ESHA Database role 'FPRole', found under User Mapping.
Create a "UDL" file on the Client machine
- On the client machine, create a new file called "esha.udl" in the "c:\program files\esha research\{program}sql" folder. Make sure that file extensions aren't hidden or else this will look like a text file.
- Open the "esha.udl" file. It should open as a Properties -type dialog.
- Click the "Provider" tab.
- Select "Microsoft OLE Provider for SQL Server".
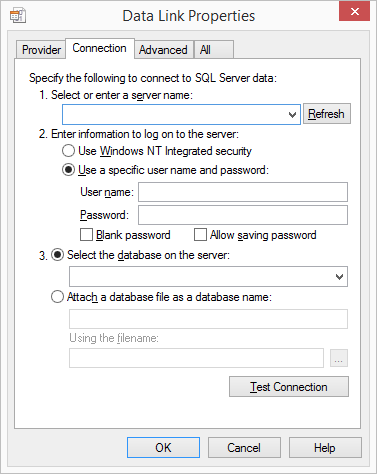
- Press "Next" (Connection tab).
- Choose your server from the list, or type it in. Generally this is "servername\esha".
- Choose to "Use a specific user name and password".
- Type in the user name and password created above.
- From the database list, select the database you wish to connect to (typically 'eshadata' for Food Processor).
- Press "Test Connection" to test the database connectivity.
- If the test is successful, press "Ok".
Make changes to the ini file
- Open the program's ini file, located in "c:\program files\esha research\{program}sql".
- Change "UsesUDLFileConnection=0" to "UsesUDLFileConnection=1".
- Change "UDLFilePathString=" to "UDLFilePathString=c:\program files\esha research\{program}sql\esha.udl".
- Save the changes to the ini file and exit.
Comments
0 comments
Please sign in to leave a comment.